Are you dealing with a Windows PC or laptop that won’t stop crashing? Maybe your PC is constantly freezing or displaying error messages. We know how frustrating a PC that won’t work right can be. Luckily, there are some easy ways to fix a Windows PC that is consistently crashing. Today, we’ll review 9 easy fixes you can do at home if you have a Windows PC that won’t stop crashing on you. Let’s get into it.
GET SECURITY ALERTS, EXPERT TIPS – SIGN UP FOR KURT’S NEWSLETTER – THE CYBERGUY REPORT HERE

Tip #1 – Check all of your cable connections
While it might sound obvious, the first step to troubleshooting a computer that constantly crashes is ensuring everything is firmly plugged in. It’s often the most overlooked step, so if you’re using a desktop, you’ll want to look behind your PC and ensure everything is plugged in. It would be best to try using a different electrical outlet to first rule out any electrical issues in your home.
If you feel comfortable opening up your desktop PC, you can also go inside the case and ensure all your PCI connections are firmly plugged in. You’ll want to ensure all your cables going to the power supply are firmly connected, and the same is true with the PCI power cables that supply electricity to the GPU and CPU.

HOW TO FINALLY RESOLVE THE RED SCREEN OF DEATH ON WINDOWS 10
Tip #2 – Make sure your computer isn’t overheating
Computer overheating is a common cause of intermittent shutdowns and crashes. If your CPU (Central Processing Unit), essentially the brain of your computer, or graphics card gets too hot, your computer might shut down to ensure the components aren’t damaged. If you notice that your laptop or desktop is giving off a lot of heat, or in the case of a laptop, it is hot to the touch, or if you notice your fans running louder than usual, these are all signs of overheating.
If your computer is overheating, the first step is to clean it thoroughly. I recommend blowing dust out of the interior fans with compressed air and keeping your PC in an area where it can receive proper airflow. If you have a desktop PC, try not to keep it under your desk. Keeping a PC under a desk can cause issues with dust build-up and lack of airflow. It’s best to keep your desktop in a part of your home or office where it can receive a decent amount of airflow.

WINDOWS UPDATE FLAW COULD BE A HIDDEN GATEWAY TO ZOMBIE VULNERABILITIES
Tip #3 – Boot your PC into safe mode
If your cables are all plugged in correctly and your computer isn’t overheating, it’s time to boot your Windows PC into safe mode. Booting into safe mode allows you to run your PC with the necessary files and drivers turned on to make the PC run. That way, you can determine if new software or hardware conflicts with your PC, causing it to crash. While in safe mode, you can access Windows error logs and run other diagnostics to figure out what is causing your PC to crash.
TAKE YOUR WINDOWS PC’S SECURITY TO THE NEXT LEVEL WITH THESE SIMPLE STEPS
How to boot into safe mode (Windows 10)
There are a few different ways to boot into Windows safe mode, and it is a bit different depending on whether you are using Windows 10 or 11. To start, here’s how you can boot into safe mode on Windows 10 from the settings panel:
- Press the Windows key
- Click Settings

- Click System
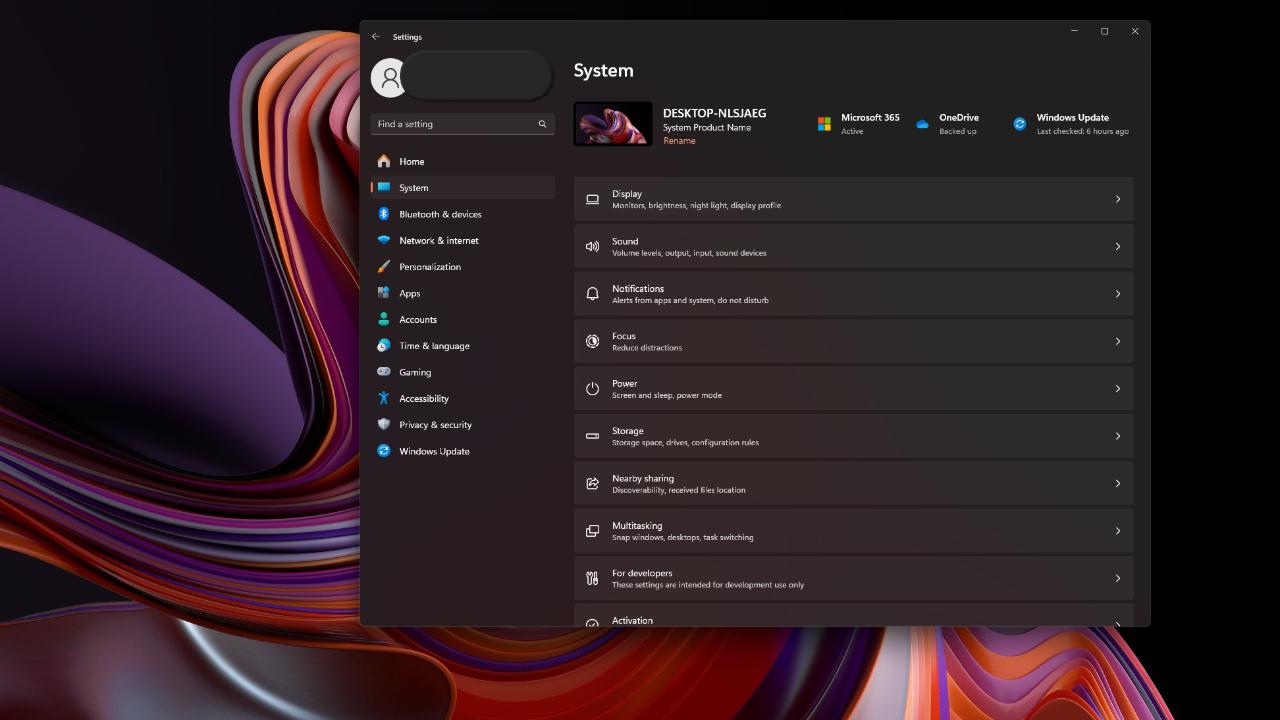
- Scroll down and click Recovery
- Click Advanced Startup – Restart Now
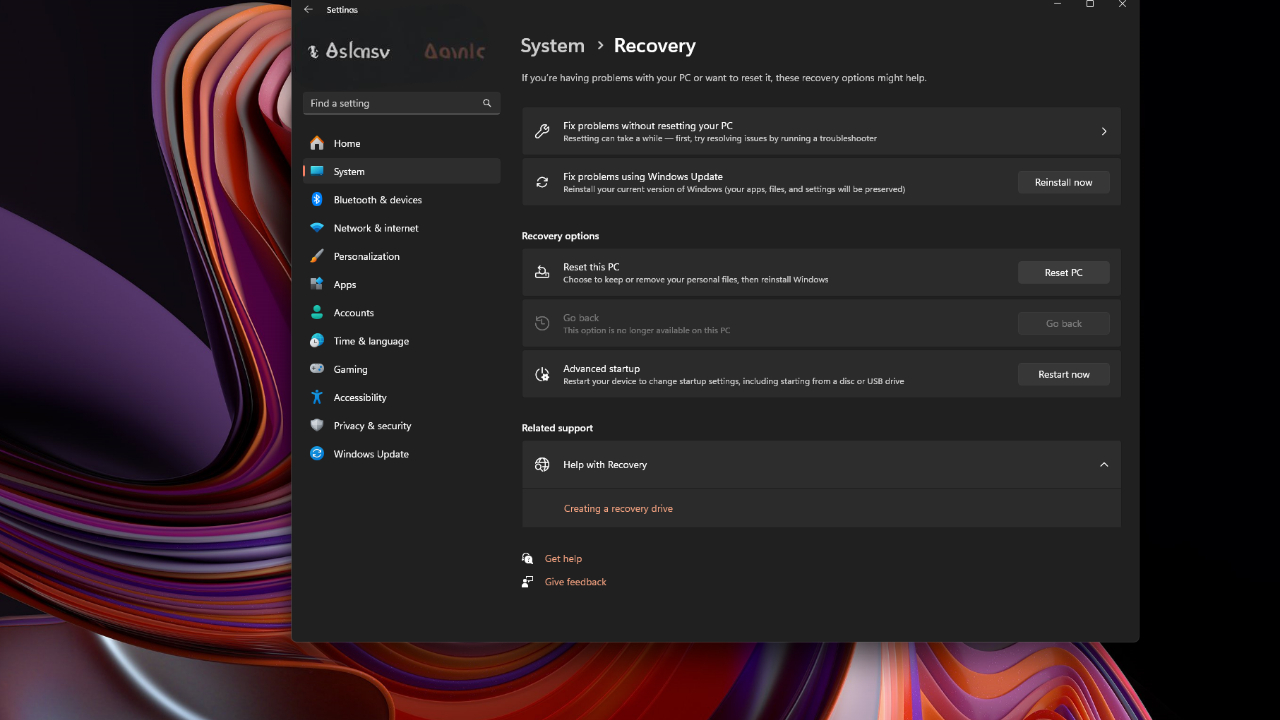
- Once your computer restarts, you’ll click Troubleshoot
- Click Advanced options
- Click Startup settings
- Click Restart again
Your computer will restart again, and this time, your computer will boot into safe mode.
How to boot into safe mode (Windows 11)
The process is slightly different if you use a Windows 11 PC instead of a Windows 10 machine. Here’s what to do if you are using a Windows 11 PC:
- Press the Windows key or click on the Start button
- While holding the Shift key, click the power icon in the bottom left corner
- While continuing to hold the shift key, press restart

Once your computer restarts, it will automatically boot into safe mode.
Tip #4 – Check the Windows logs for errors
Now that you’re in safe mode, you should look at the Windows logs. You can access the Windows error logs through the Event Viewer. Here’s how to access the Windows Event Viewer:
- Press the Windows icon in the start bar
- Search for Event Viewer

- Open the Event Viewer app
- In the left panel, double-click Windows logs
- Click either Application or System
- Application will show you Windows logs and errors related to applications
- System will show you Windows logs and errors related to the operating system
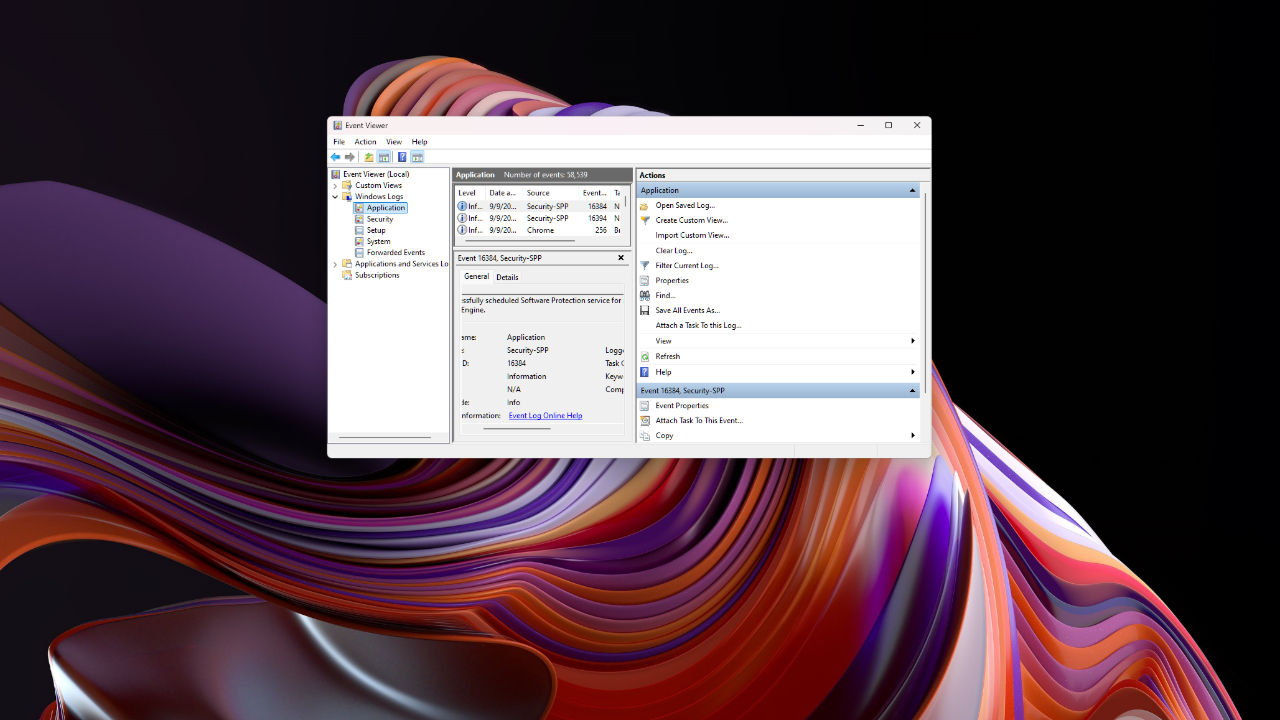
- In both the Application and System, read through and write down the error code for any errors when your PC last crashed.
- You can access the error code by double-clicking any error in the log.
- Run a Google search for any error codes that come up.
Tip #5 – Perform an OS update
An outdated version of Windows can cause conflicts with both your software and even hardware components in your PC. This is a major cause of PC crashes, so you’ll want to ensure your Windows operating system is entirely up to date. Here’s how to run a system update on Windows:
- Click the Windows icon in the taskbar
- Click the Gear (Settings) icon in the start menu
- Click Windows Update
- Press the Check for Updates button
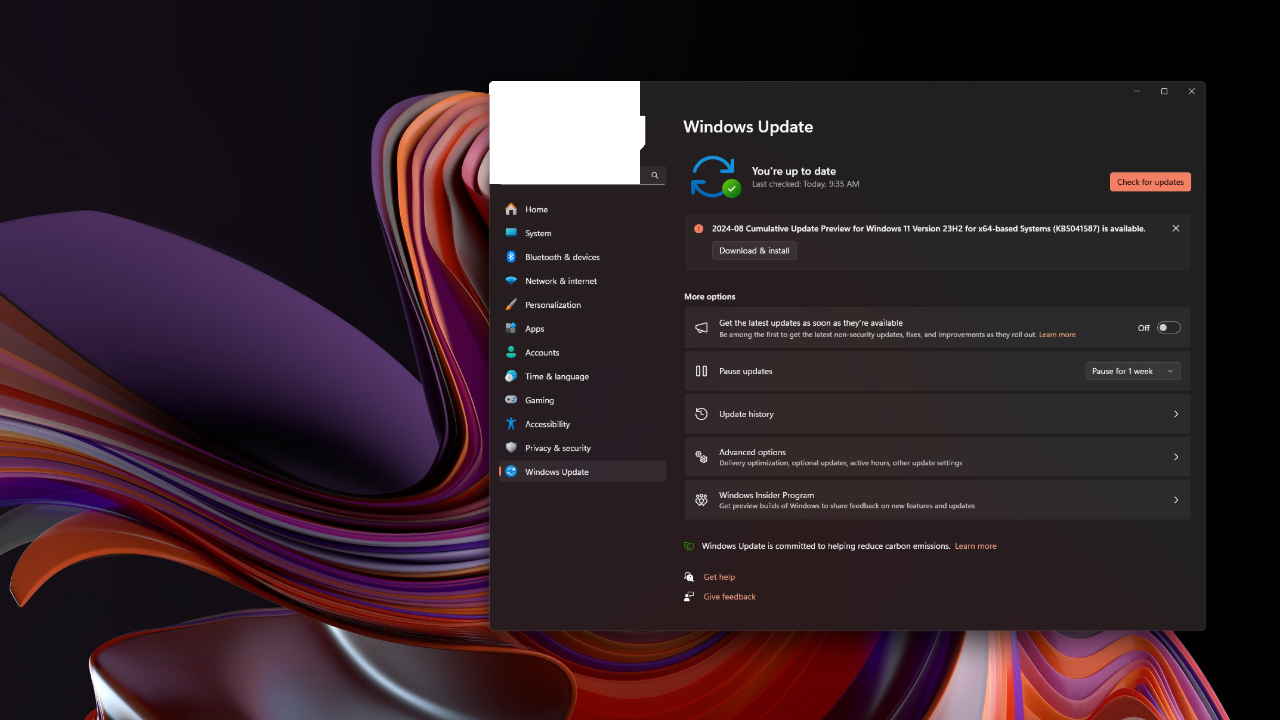
- Download and install any new updates available for your PC
Tip #6 – Run an antivirus scan
Even if you don’t own any antivirus software, you should at least run a scan with the built-in Windows Defender. Here’s how to access Windows Defender and run an antivirus scan:
- Click the Windows icon in the taskbar
- Click the Gear (settings) icon in the start menu
- Click Privacy & Security

- At the top, click Windows Security
- Click Virus & Threat protection
- Click the Scan options button on the next, underneath Quick scan
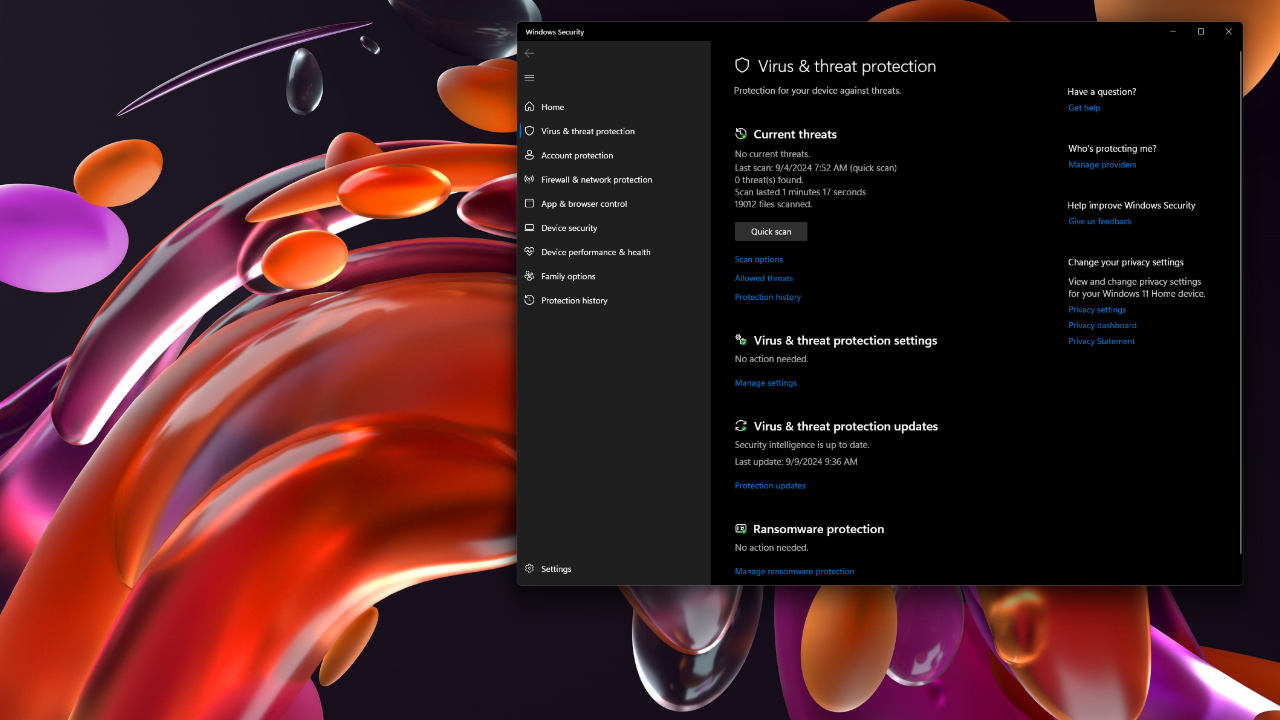
- Select Full scan
- Quarantine any threats detected during the virus scan.
Is Windows Defender enough to protect you?
While Windows Defender offers robust, built-in security for Windows users, it has limitations in areas like phishing and spam protection and may not update as swiftly as some premium solutions. To stay protected from malicious links, phishing scams, and ransomware, consider investing in strong antivirus software. The best way to safeguard yourself from malicious links that install malware, potentially accessing your private information, is to have antivirus software installed on all your devices. This protection can also alert you to phishing emails and ransomware scams, keeping your personal information and digital assets safe.
My top pick is TotalAV, and you can get a limited-time deal for CyberGuy readers:
Tip #7 – Check the hard drive for errors
You can use the Windows Command Prompt to check your hard drive for errors. If your hard drive has an error, you might need to perform a system restore, which we’ll discuss later. For now, here’s how to use the command prompt to check for hard drive errors:
- Click the Windows icon in the taskbar
- Type CMD and open the Command Prompt

- Right-click on the Command Prompt box and click Run as administrator
- Type sfc /scannow and press enter

The command prompt will now check your hard drive for corrupt files and replace them. This may take some time. Once the process is complete, and you have errors that cannot be automatically replaced, you will unfortunately need to replace your hard drive and reinstall Windows.
Tip #8 – Check for issues with your RAM
Issues with your PC’s RAM can also cause your Windows PC to crash randomly. More often than not, if you have an issue with your RAM, you’ll need to replace the RAM modules on the motherboard. This can be done at home quickly if you have the technical knowledge, but you can also go into any computer shop to get your RAM replaced for a small fee. Here’s how to check for issues with your RAM on your Windows PC:
- At the same time, press the Windows Key + R on your keyboard
- This will execute the Run application in Windows
- Type Mdsched.exe and press enter; this will launch the Window Memory Diagnostics repair tool

- Click Restart now and check for memory problems
Now, your computer will run through a memory check, and if you encounter an issue, beware that you might have to replace your RAM.
Tip #9 – Perform a system restore
If your PC just started crashing, you might be able to fix the issue by performing a system restore. A system restore will restore your Windows operating system to a specific date and time of your choosing. This way, you can restore your OS to a point before the crash begins and troubleshoot from there. It’s important to note that when you perform a system restore, your computer will be restored as it was on the date and time you chose. This means you will lose any recent files or settings, so this should be a last-step solution in your troubleshooting process.
How to perform a system restore
- Click the Windows icon in the taskbar
- Type system restore
- Click Create a Restore Point

- Once the system restore wizard opens, you will see a notification telling you what the system restore will do, click next
- Select a time and date for the system restore and click next
- Click Finish
Kurt’s key takeaways
Having a Windows PC that won’t stop crashing can be a massive headache. Luckily, there’s a lot of information out there on how to troubleshoot a PC that just won’t stop crashing. I’ve gone over nine of the most commonly used tips to fix a crashing Windows PC, but there are other reset options out there, many of which require a higher degree of technical ability than what we’ve gone through today.
What do you find most challenging about using a Windows PC today? Let us know in the comments below.
TO GET MORE OF MY SECURITY ALERTS, SUBSCRIBE TO MY FREE CYBERGUY REPORT NEWSLETTER
Related:
How to finally resolve the red screen of death on Windows 10
How to finally resolve the red screen of death on Windows 10
Copyright 2024 CyberGuy.com. All rights reserved. CyberGuy.com articles and content may contain affiliate links that earn a commission when purchases are made.


1 comment
Great Info.