You know that feeling when you unbox a new Mac for the first time? It’s awesome, right? You can’t help but admire how sleek and smooth it looks and how bright and beautiful it glows when you turn it on. And don’t get me started on those crisp and clean keys that make typing a breeze. Before we jump into all the cool stuff you can do with your Mac, there are some important things you need to set up first. Don’t worry. I’ll guide you through them step by step.
And for those who have a new PC, check out the First 10 things to do if you got a new PC.
Enter the giveaway by signing up for my free newsletter.
1. Getting physical: Know those ports
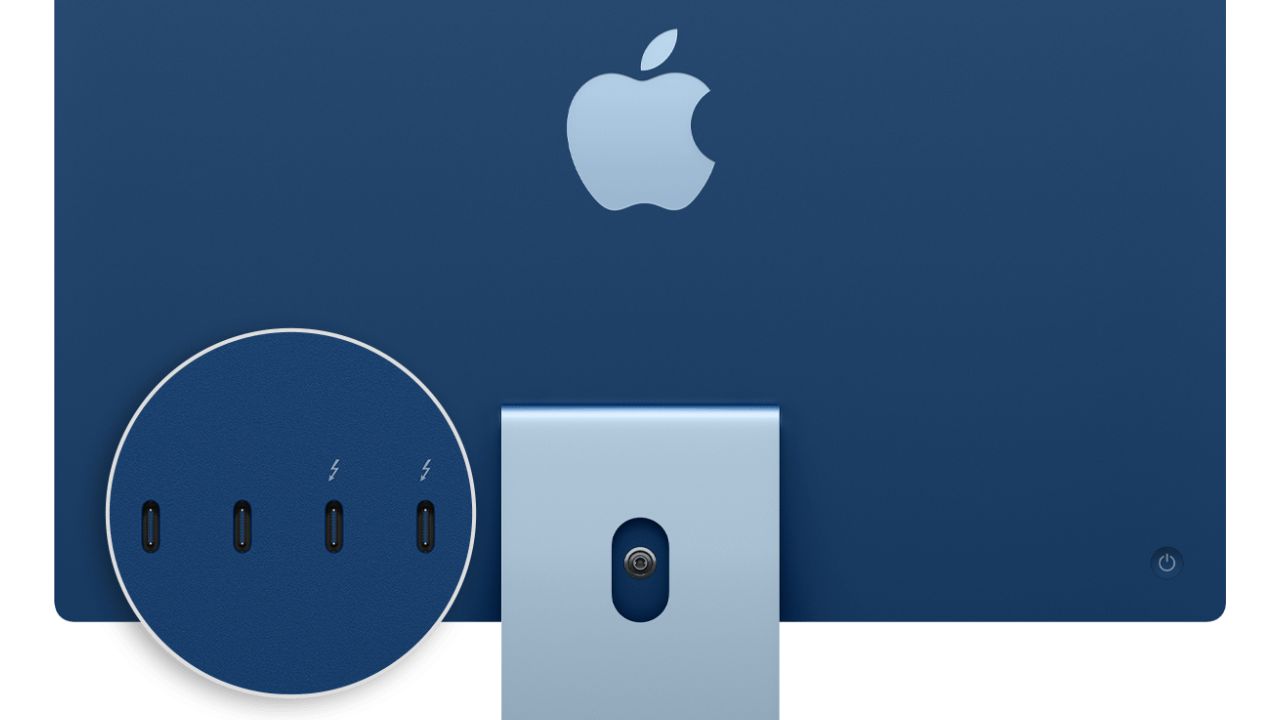
Start by checking out all sides of your Mac. Those little slots you see? Those are the ports. Depending on your Mac model, you’ll have a mix of USB-C, Thunderbolt, or even HDMI. Knowing which makes life a lot easier when it’s time to charge or plug something in.

Apple
MORE: APPLE’S TWICE AS FAST NEW MACBOOK PRO LAPTOP AND 24-INCH IMAC ALL-IN-ONE DESKTOP ARE HERE
- USB-C: Predominant on newer Macs, this versatile port manages charging, data transfer, and video output. The best part? It’s reversible and its become the standard on the latest iPhone (15).
- Thunderbolt: Resembling USB-C but with faster data capabilities. Ideal for high-res displays. Distinguished by a small lightning symbol. This slot is also used to charge your Mac.
- HDMI: Useful for connecting your Mac to a TV. More prevalent on older models.
- USB-A: The traditional USB port. While newer Macs lean towards USB-C, this classic port remains on older models and many devices.
More:
2. Powering up and initial setup
So, you’ve hit that power button on your Mac, and now what? A colorful screen pops up, ready to walk you through some simple steps.
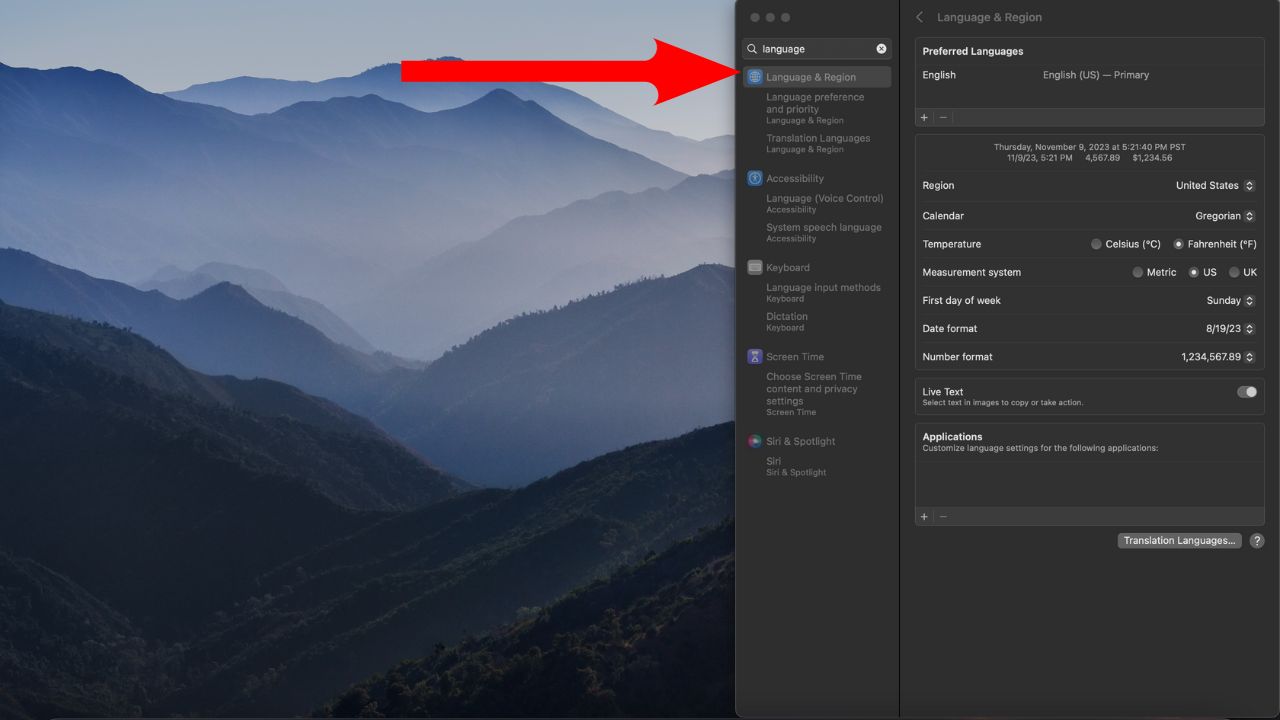
- Pick Your Language: This is the first hello from your Mac. Choose the language you’re most comfortable with.
- Location Setup: Choosing your region is key. It tunes your Mac to the local time zone, so you’re on schedule with the rest of your area. This setting also adjusts formats for dates, times, and currency, personalizing your experience to your locale and ensuring that your work aligns with regional standards. It’s a simple step, but it’s all about making your Mac feel right at home with you.
- Wi-Fi Time: Let’s get you online! Pick your network from the list, type in the password, and you’re connected.

3. Apple ID: The key to unlocking your Mac’s full potential
Think of the Apple ID as the link that binds the Apple universe together. Ever snapped a pic on your iPhone and wished it was on your Mac? Or maybe you bought a cool app on your iPad and wanted it on your Mac too? That’s where the Apple ID comes in to connect your devices and their content.
- iCloud Drive: With an Apple ID, you also get access to iCloud. This cloud storage safely tucks away your files, photos, and more. Lost your Mac? Need to grab a file from another device? iCloud has you covered.
- App Store & Purchases: Ever seen a cool app or song you wanted to buy? Your Apple ID handles that too. Purchase once, and enjoy on any Apple device linked to your ID.
- Don’t Have One? No Worries: Setting up an Apple ID is a breeze. When you’re going through your Mac’s initial setup, it’ll prompt you. Just follow the steps, and in a few minutes, you’ll be good to go.
In essence, the Apple ID is like a digital passport that allows you to access all Apple services and make all of your devices work together seamlessly. It is also a way to protect your account and personal information with security features like two-factor authentication and phishing alerts. With an Apple ID, you can also share your purchases or subscriptions with your family members using Family Sharing.
HOW TO TRANSFER PHOTOS AND VIDEOS FROM YOUR EXTERNAL HARD DRIVE AND APPLE DEVICES
4. Time Machine: A safety net for your files
Ever had that mini-heart attack when you can’t find an important file or photo? We’ve all been there. But with Time Machine, those “Oops!” moments are a thing of the past.

- What is it?: Time Machine regularly creates backups of your entire system. So, if you accidentally delete that big presentation or those vacation pics, Time Machine can whisk you back to a time when they were still there.
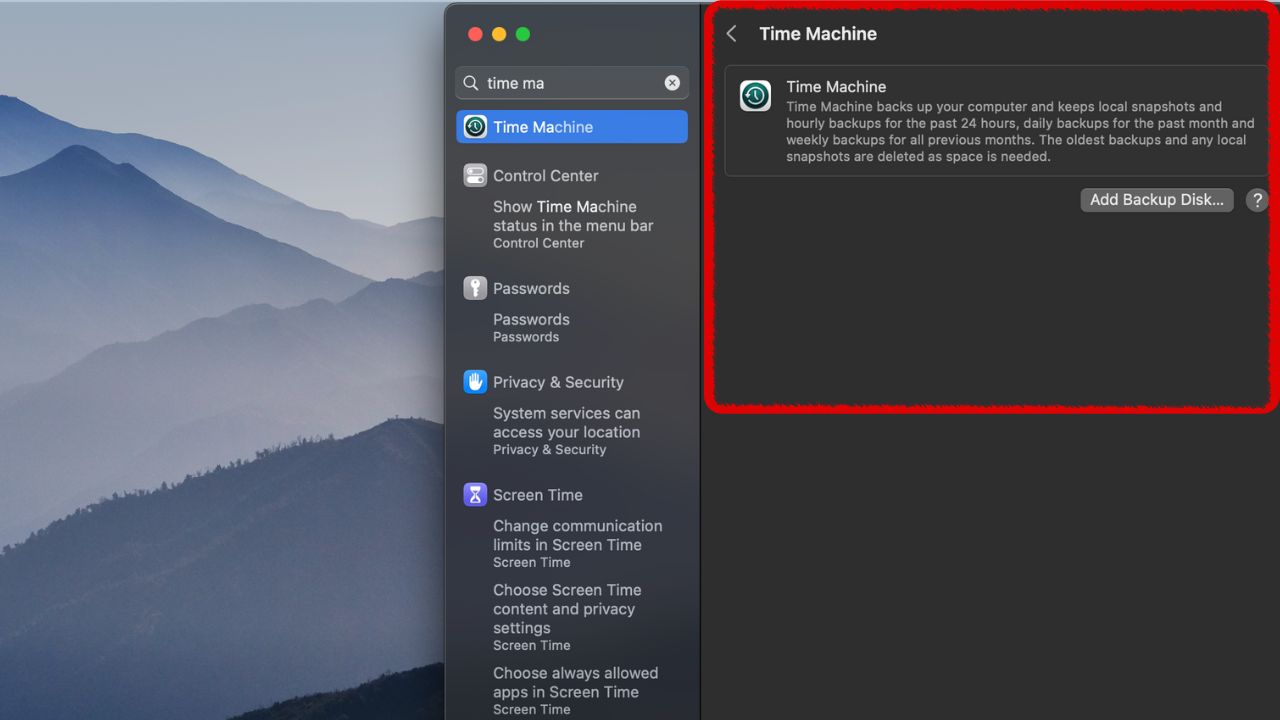
- Getting Started is Easy: All you need is an external drive. Plug it into your Mac, and a prompt will ask if you want to use it for Time Machine. Say yes, and from then on, it’ll regularly save your stuff without you having to lift a finger. If it doesn’t prompt you, you can also go into System Preferences, select Time Machine, and choose the drive manually.
- Peace of Mind: With Time Machine running, there’s a sense of security. Whether it’s a system hiccup or just human error, knowing there’s a backup plan (literally) can be a huge relief. To restore files with Time Machine, simply click the Time Machine icon, choose the desired backup from the visual timeline, and hit ‘Restore’ to retrieve your file. It’s a quick fix for reversing accidental deletions.
In short, Time Machine is that trusty sidekick every Mac user should get acquainted with. It works silently in the background, ensuring no cherished memory or critical file ever truly gets lost in time.
HOW TO REMOVE MALWARE ON A MAC 2025
5. Customize your space and apps
Personalizing your Mac is a breeze. Swap out that default wallpaper for something that speaks to you, whether it’s a calming seascape or a vibrant abstract piece. The Dock is your command center; resize it to your liking and keep your go-to apps within reach. Arrange your applications so that everything feels just right.
Some of the apps and features you may want to try are Safari, Mail, Messages, FaceTime, Photos, Music, Podcasts, TV, News, Books, Notes, Reminders, Calendar, Maps, Siri, Spotlight, and more. You can find these apps and features in the Applications folder, the Launchpad, the dock, or the menu bar.
Next, why not take a little shopping trip to the Mac App Store? Think of it as a treasure trove, stacked with everything from nifty little widgets that streamline your day, to games that’ll eat up your free time in the best way.
THE BEST WIRELESS MICE OF 2025
Quick tips & tricks
- Use Spotlight (magnifying glass icon in the upper right corner) for super-fast searches.
- If an app isn’t responding, try the ‘Force Quit’ option by clicking the Apple logo in the top left corner of your screen and selecting Force Quit from the menu. This will open a window where you can choose the app that you want to quit and click Force Quit.
- If you find your Mac getting cluttered after some time with it, visit our page to learn How to tidy up your desktop on a PC or Mac.
- Worried your webcam can be compromised? Check our recommendations for webcam covers here.
- Be sure to protect your new Mac with strong antivirus protection. The best way to safeguard yourself from malicious links that install malware, potentially accessing your private information, is to have antivirus software installed on all your devices. This protection can also alert you to phishing emails and ransomware scams, keeping your personal information and digital assets safe.My top pick is TotalAV, and you can get a limited-time deal for CyberGuy readers: $19 your first year (80% off) for the TotalAV Antivirus Pro package. Get my picks for the best 2025 antivirus protection winners for your Mac & iOS devices.
- If you ever find that malware has made its way onto your device, visit our page here to learn how to remove it.
Kurts key takeaways
From the very start, your Mac isn’t just a machine—it’s a blank slate awaiting your personal signature. Whether it’s through selecting a quirky wallpaper that brightens your day or organizing the Dock with your most essential apps, your Mac should reflect your personality and style.
It’s about creating a space that’s not just functional but also inspiring, where every click and swipe feels instinctive, and every tool is right where you need it. The personalization doesn’t end at aesthetics; it extends to the applications and settings that support your workflow and playstyle, ensuring that your Mac is not only a reflection of who you are but also an enabler of what you do.
How do you infuse your personality into your Mac setup? Share your favorite tips in the comments below.
FOR MORE OF MY TECH TIPS & SECURITY ALERTS, SUBSCRIBE TO MY FREE CYBERGUY REPORT NEWSLETTER HERE
Copyright 2025 CyberGuy.com. All rights reserved. CyberGuy.com articles and content may contain affiliate links that earn a commission when purchases are made.


