

Unboxing a new iPad feels great. Before you start streaming, shopping, or downloading apps, pause for a few minutes. Early setup choices affect your privacy, security, and performance long term.
The good news is that iPads include powerful protections if you enable them. This guide walks you through exactly what to do first so your new device stays secure from the start.
Got a new computer too? We also have step-by-step guides on what to do if you get a new PC and what to do if you get a new Mac, so you can secure every device the right way.

Credit: Apple
Start with the basics during iPad setup
When you power on your iPad for the first time, follow the on-screen setup carefully. These early choices protect your data and shape how secure your device stays over time.
How to set up a strong passcode on iPad
During setup, your iPad asks you to create a passcode. Do not rush this step.
- When prompted, tap Passcode Options
- Select Custom Alphanumeric Code or Custom Numeric Code
- Create a passcode that is long and unique
- Avoid birthdays, repeating numbers, or simple patterns
- Confirm the passcode to continue
If you already completed the setup, you can change it later:
- Open Settings
- Scroll down and tap Face ID and Passcode or Touch ID and Passcode
- Tap Change Passcode
- Tap Passcode Options on the bottom left of the screen
- Choose a stronger format
A strong passcode protects your data even if someone physically gets your iPad.
Sign in with your Apple ID and secure it
During setup, sign in with your Apple ID or create one if needed. Your Apple ID powers iCloud backups, Find My iPad, App Store downloads, and device recovery tools. Without it, many security features do not work.
Turn on two-factor authentication
Confirm two-factor authentication is enabled for your Apple ID.
- Open Settings
- Tap your Apple ID name at the top
- Tap Sign In and Security
- Tap Two Factor Authentication
- Make sure it is turned on
This prevents anyone from signing in without a trusted device or verification code.
Review sign-in alerts and trusted devices
Apple alerts you when your Apple ID is used on a new device. You can also review trusted devices manually.
- Open Settings
- Tap your Apple ID name at the top
- Look for the list of devices shown under your Apple ID
- Tap any device to review details
- Remove any device you do not recognize by clicking on it, scrolling down, and tapping Remove from Account
If you do not see devices immediately:
- Tap Sign-In & Security
- Scroll down to view associated devices
This helps you catch unauthorized access early.
Turn on automatic software updates
Keeping iPadOS updated is one of the most important security steps. During setup:
- When asked about updates, choose Automatically Install Updates
To confirm or enable it later:
- Open Settings
- Tap General
- Tap Software Update
- Enable Automatically Install
This ensures security fixes install automatically.

Credit: Apple
Enable Find My iPad to protect against loss or theft
Find My iPad lets you locate, lock, or erase your device remotely if it goes missing. During setup:
- When prompted, choose Turn On Find My iPad
To verify it is enabled:
- Open Settings
- Tap your Apple ID name
- Tap Find My
- Tap Find My iPad
- Turn on Find My iPad
- Turn on Find My network
- Turn on Send Last Location
These options help locate your iPad even when it is offline or the battery is low.
Use a password manager right away
Remembering passwords manually leads to reuse across accounts. A password manager helps create and store strong, unique passwords automatically. During setup:
- When asked about passwords and security, choose Turn On iCloud Keychain
To confirm or enable it after setup:
- Open Settings
- Tap your Apple ID name at the top
- Tap iCloud
- Tap Passwords & Keychain
- Turn on Sync this iPad
This enables iCloud Keychain across Safari and supported apps. If you want a cross-platform option that works beyond Apple devices, a third-party password manager like NordPass is another option. A password manager creates strong, unique passwords and stores them securely, so you do not have to.
- Unlimited password storage
- Secure sharing
- Password health reports
- Auto-fill and emergency access
- Data breach monitoring to alert you if your credentials have been exposed
- A Security Dashboard with tools like the Data Breach Scanner and Password Health Checker to identify weak, reused, or compromised passwords
CyberGuy Exclusive Deal: Save 52% now with CyberGuy’s exclusive NordPass offer – Get 1 extra month FREE with a 2-year plan. Try 30 days risk-free for only $1.43 per month!
Upgrading from an older iPad? Use Quick Start
If you are replacing an older iPad, Quick Start transfers data securely.
- Place the old iPad near the new one
- Turn on the new iPad
- Follow the on-screen instructions
- Authenticate using Face ID, Touch ID, or your old passcode
- Choose what to transfer and continue
This keeps app settings and data encrypted during transfer.
Update iPadOS if you skipped it earlier
If you did not install updates during setup, install them now to close known security gaps.
- Open Settings
- Click General
- Tap Software Update
- Install any available update
Turn on automatic backups
Backups protect your photos, messages, and files.
- Go to Settings
- Click Apple ID
- Tap iCloud
- Click iCloud Backup
- Turn it on
Your iPad backs up automatically when charging and connected to Wi Fi.

Review privacy settings you should never skip
Apple offers powerful privacy tools, but many require review.
Location Services
- Go to Settings
- Tap Privacy and Security
- Click Location Services: Set most apps to While Using the App, Change unnecessary apps to Never, Enable Precise Location only when needed
App tracking controls
- Go to Settings
- Tap Privacy and Security
- Click Tracking
- Turn off Allow Apps to Request to Track
Analytics
- Go to Settings
- Tap Privacy and Security
- Scroll down to Analytics and Improvements and tap it
- Disable sharing analytics
Ads
- Go to Settings
- Tap Privacy and Security
- Scroll down and tap Apple Advertising
- Turn off Personalized Ads

Use strong antivirus software for extra protection
iPadOS is secure by design, but scams, phishing links, and malicious websites still target users. Strong antivirus software adds another layer of defense. The best way to safeguard yourself from malicious links that install malware, potentially accessing your private information, is to have strong antivirus software installed on all your devices. This protection can also alert you to phishing emails and ransomware scams, keeping your personal information and digital assets safe.
TotalAV is easy to set up and offers real-time protection for paid users, keeping your devices safe around the clock. It includes tools to block phishing scams, remove ransomware and spyware, and clean up adware and junk files. The software also features a browser manager, system tune-up tools, and protects across Windows, Mac, Android, and iOS devices.
GET MY EXCLUSIVE CYBERGUY TOTALAV DEAL:
Please note:
1) If you're having difficulty seeing either of the above deals, do this:
- If you're on a mobile device, hold down the link above, "Copy Link", and then paste it into a private or incognito browser.
- If you're on a laptop or desktop, right click the link, "Copy Link", and then paste it into a private or incognito browser.
2) During registration you may see optional upsells you can decline. Our top pick is the core antivirus product.
3) If you need help after your purchase, you can reach TotalAV directly through their official support page here.
Secure your web browsing and email
Your iPad often handles banking, shopping, and personal messages.
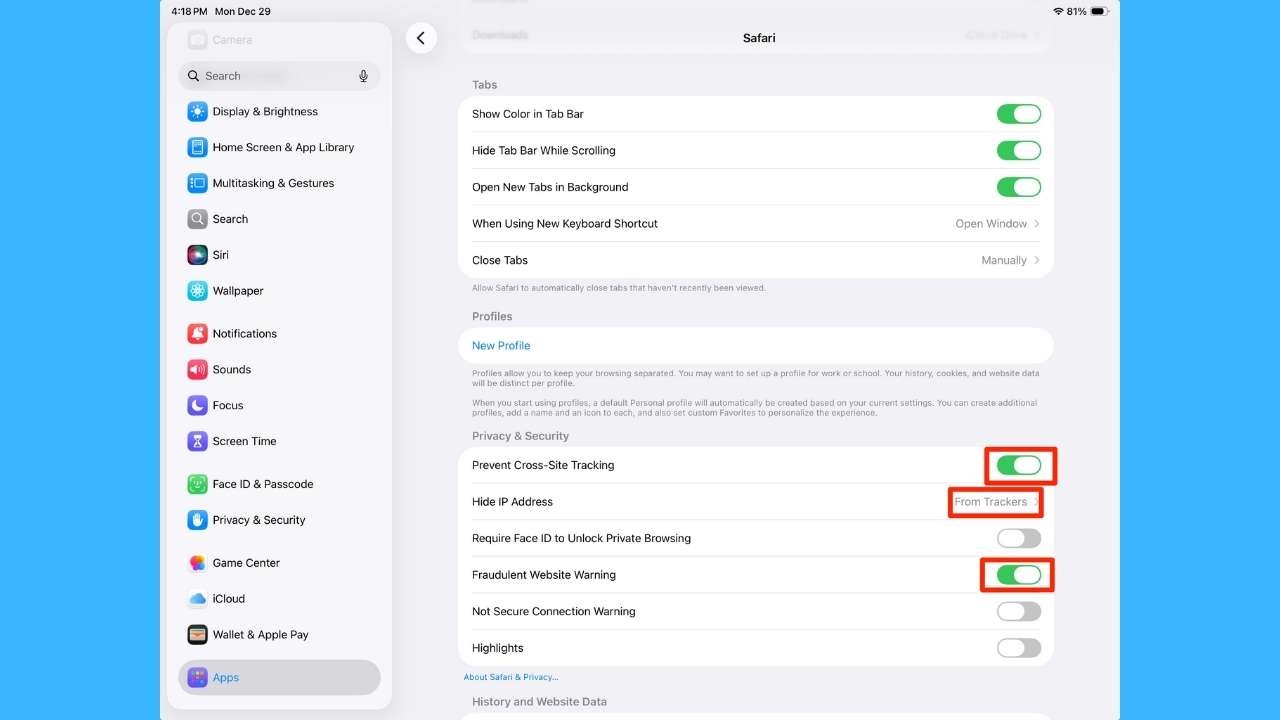
Safari privacy settings
- Go to Settings
- Click Apps
- Tap Safari
- Scroll down and enable: Prevent Cross-Site Tracking, Hide IP Address from Trackers and Fraudulent Website Warning.
Install apps carefully and review permissions
Before downloading an app:
- Check the developer name and ratings
- Review the App Privacy section
- Avoid apps requesting unnecessary access
After installing, review permissions in Settings > Privacy and Security.
Customize notifications
Too many alerts cause distraction. Turn off alerts for non-essential apps
- Go to Settings
- Click Notifications
- Tap on each app you have downloaded to your iPad
- Turn off Allow Notifications
Set up Screen Time or Family Sharing if needed
If a child or teen uses the iPad, Screen Time is essential. It lets you control app content, purchases, and downloads.
Turn on App and Website Activity
This enables tracking and controls.
- Go to Settings
- Scroll down and tap Screen Time
- Click App & Website Activity
- Turn on App & Website Activity
Without this enabled, limits and reports will not work.
Set a Screen Time passcode
- Go to Settings
- Scroll down and tap Screen Time
- Tap Lock Screen Time Settings
- Create a Screen Time passcode
- Confirm the passcode
Go back to the main Screen Time screen.
- Tap App Limits
- Tap Add Limit
- Choose an app category or a specific app
- Tap Next
- Set a daily time limit
- Tap Add
App Limits will now work as expected.
Restrict content and downloads
- Go to Settings
- Scroll down and tap Screen Time
- Tap Content & Privacy Restrictions
- Turn on Content & Privacy Restrictions
- Tap iTunes & App Store Purchases and set Installing Apps, Deleting Apps, and In-App Purchases to Don’t allow
- Below Require Password, click next to Always Require, and a blue check mark will appear.
This prevents unauthorized downloads or spending.
Use Family Sharing for ongoing control
Family Sharing lets you manage Screen Time purchases, subscriptions, and approvals from your own device.
A Texas mom says she spent the night in jail after speaking up online about dirty water in her town. The case was later dropped, but her story raises a troubling question: could something you post online ever put you at risk?

Missed this event? Sign up via the registration form and see our live recording.
See Kurt’s Prime Day picks for useful gadgets, practical upgrades and everyday tech while the deals last.
How to set up Family Sharing (latest iPadOS)
- Open Settings
- Tap your Apple ID name at the top
- Tap Family Sharing
- Tap Set Up Your Family
- Add a child using their Apple ID or create one for them
- Assign a parent or guardian when prompted
- Turn on Screen Time for the child during setup
Once Family Sharing is enabled, you can manage Screen Time remotely from your own iPhone or iPad.
Important to know
- Some Screen Time controls may only appear on the organizer’s device, not on the child’s iPad
- This is normal behavior on the latest iPadOS
To manage limits later:
- Open Settings
- Tap Family
- Tap the child’s name
- Tap Screen Time
Protect your iPad beyond software
Good habits matter too.
- Use a protective case and screen cover
- Avoid public charging stations without a trusted cable
- Never leave your iPad unattended in public
Related Links:
- How to tell if your iPad has been hacked
- How to transfer info from an old iPad to a new iPad
- How to securely lock your iPhone and iPad from prying eyes
- Best tablets of 2025
Kurt’s key takeaways
A new iPad is powerful, flexible, and packed with potential. Taking time to set it up properly protects your privacy, secures your data, and saves frustration later. Most of these steps take minutes but protect you for years. Once everything is in place, you can enjoy your iPad knowing it is working safely and responsibly in the background.
If you could give one setup tip to someone opening a new iPad today, what would it be and why? Let us know in the comments below.
FOR MORE OF MY TECH TIPS & SECURITY ALERTS, SUBSCRIBE TO MY FREE CYBERGUY REPORT NEWSLETTER HERE
Copyright 2025 CyberGuy.com. All rights reserved. CyberGuy.com articles and content may contain affiliate links that earn a commission when purchases are made.
🎙 Now Streaming: My New Podcast: The CyberGuy Report
Kurt’s Top Deals
Deals move fast and inventory can be limited, so don’t wait too long.
| 🔥 Editor’s pick  Summer entertaining Ninja SLUSHi Machine (26% off) Frozen drinks and slushies at home in minutes. | |
| 💰 Top deal  Outdoor essential TYPEC Solar Bug Zapper (36% off) Solar-powered bug zappers for patios and camping. |

