You’ve got questions? I’m a tech expert with the answers. We recently got a question from Wayne from Burgettstown, PA. Here’s what he asked:
I would like tips on using Windows 11. Thanks for the nice articles – Wayne
It’s been about 20 months since Windows 11 was released, and its capabilities are pretty impressive. However, many of you may not even realize just how much the program has to offer. Here are 9 of my best tips and tricks for Windows 11 users.

9 tips and tricks for Windows 11 users
1. Use the Night Light Schedule
This is a great feature for someone who uses their PC for long hours at a time and finds it beneficial to rest their eyes from the constant white light. Here’s how to turn on the Night Light Schedule:
How to turn on the Night Light schedule
- Go to Start
- Select Settings
- Click System
- Select Display
- Click Night light
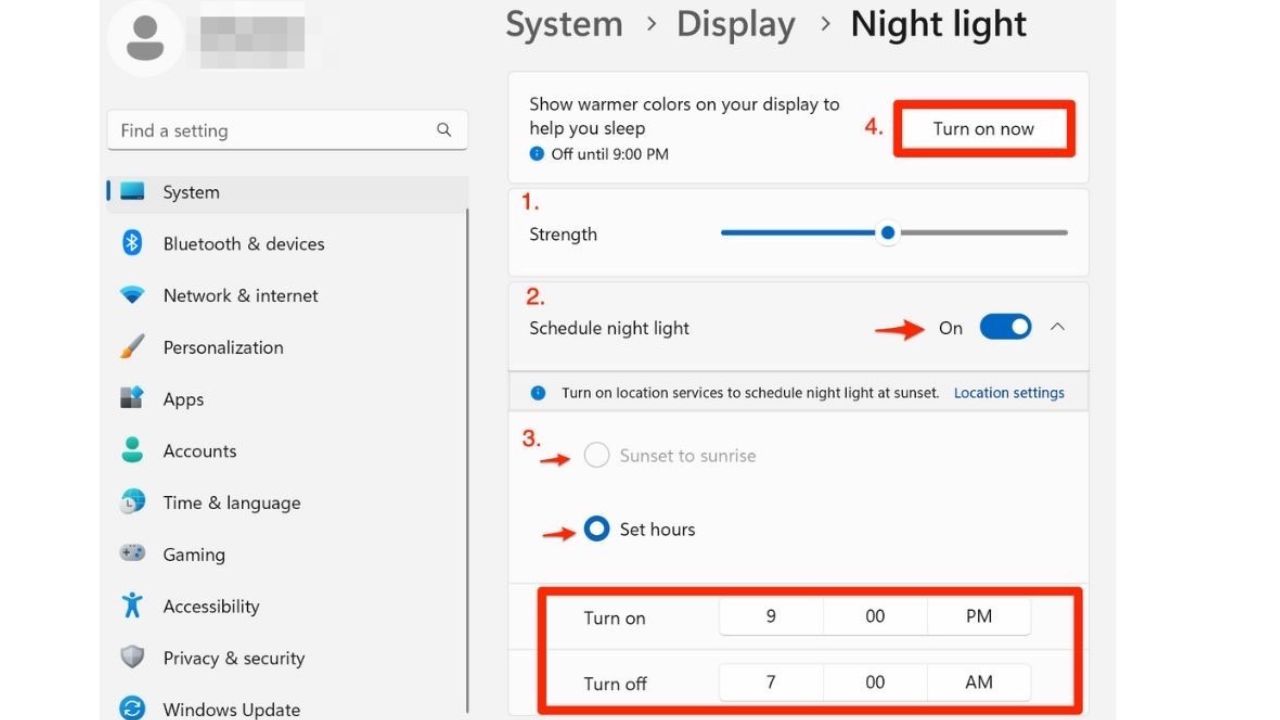
- You can easily adjust the Strength of the Night Light function by moving the slider from left to right to suit your preference
- Turn on Schedule night light by toggling On
- Select either Sunset to sunrise, or Set hours (To set hours enter custom times for the night light to turn on and off)
- *It is important to note that if you want to use Sunset to sunrise, you must turn on location services. To do this – click where it says Location settings in blue and toggle On Location settings. Also, toggle On Let apps access your location. Then tap the left arrowin the upper right corner to take you back to the Night light settings
- Then when you are ready to enable the Night light feature – tap Turn on Now
MORE: STOP FROM BEING HACKED BY GETTING THIS CRITICAL WINDOWS UPDATE NOW
2. Enable Focus Mode
When you’re trying to work on a project, it can be distracting when you’re constantly receiving notifications. That’s why Windows 11 allows you to enable Focus Mode, where you will still get notifications without them directly alerting you or making noise.
How to turn on Focus mode
- Select Start
- Select Settings
- Click System
- Click Focus
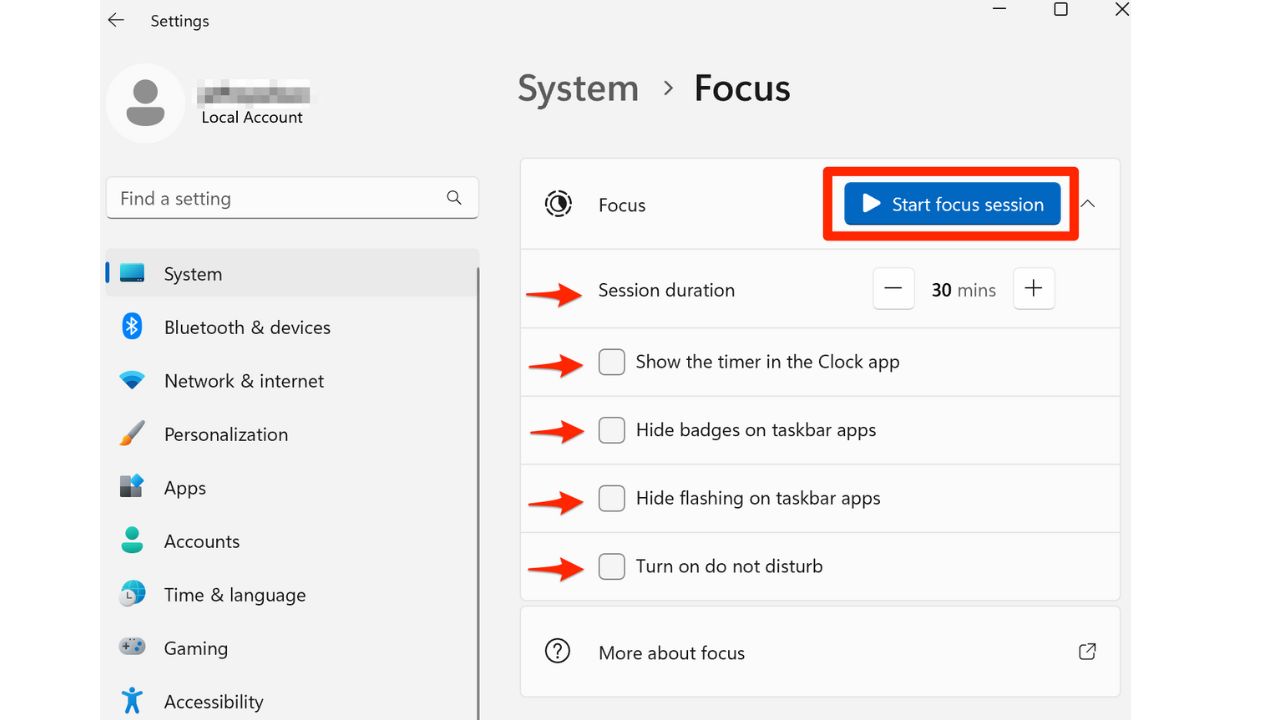
- Select session duration – click the – or + to increase or decrease the time
- Decide if you want to – Show the timer in the clock app, Hide badges on taskbar apps, Hide flashing taskbar apps, or turn on do not disturb – if you do want to enable any of these, just check the box beside it
- Then select Start focus session
MORE: WHY WINDOWS IS THE #1 TARGET FOR MALWARE: 2 EASY WAYS TO STAY SAFE
https://cyberguy.com/privacy/why-windows-is-the-1-target-for-malware-3-easy-ways-to-stay-safe/
3. Save your battery life with Sleep Settings
You always want to make sure you get the most battery life out of your computer, and adjusting its sleep behavior can help preserve that battery life immensely.
How to adjust your Sleep Settings
- Select Start
- Go to Settings
- Click System
- Select Power & battery
- Scroll down and click Screen and sleep
- Then select how long you want your device to wait before turning the screen off. Here are the options:
- On battery power, turn off my screen after
- When plugged in, turn off my screen after
- On battery power, put my device to sleep after
- When plugged in, put my device to sleep after

- You can adjust each time frame by clicking the Never dropdown and selecting a time limit

4. Use Live Captions
Live captions will give you live subtitles for a video on the spot, as opposed to only having closed captions where they were already present for certain videos. Those who need captions can strongly benefit from this setting.
How to enable and customize Live Captions
- Select Start
- Click Settings
- Select Accessibility
- Scroll down and under Hearing select Captions
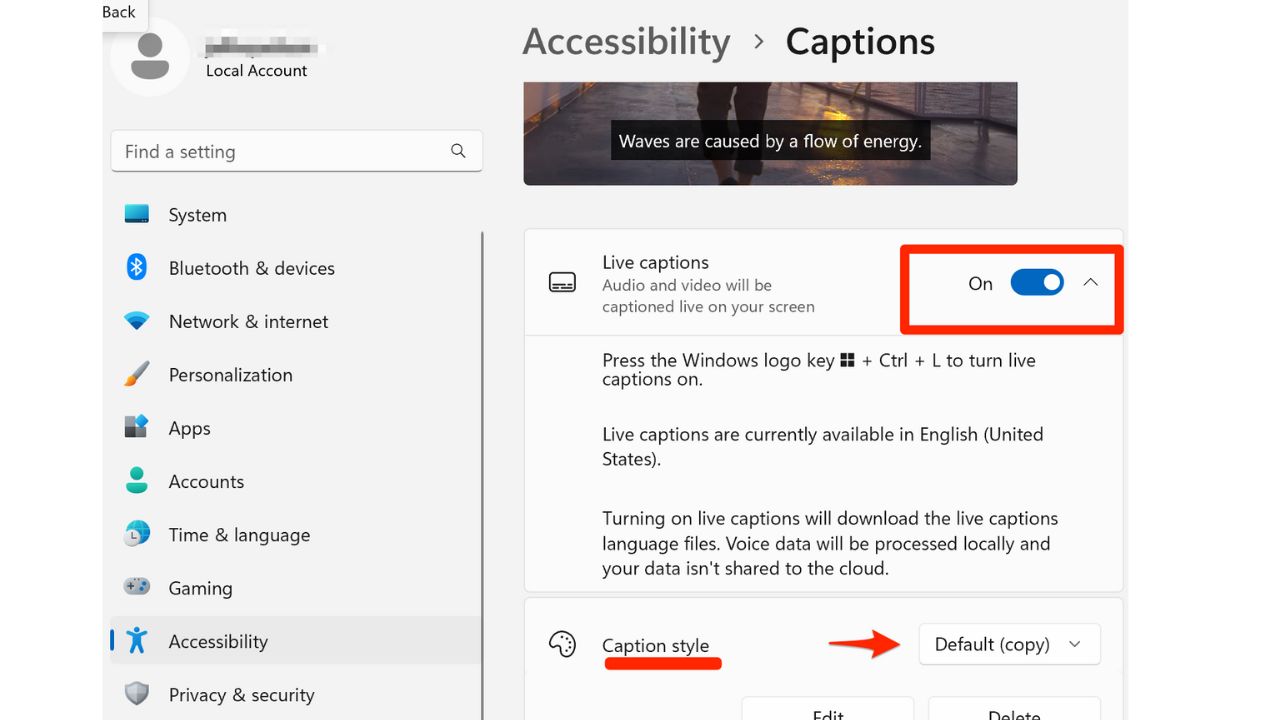
- Toggle On Live captions
- Under Caption Style, you can choose how you want your captions to appear on the screen by clicking on where it says Default (copy)
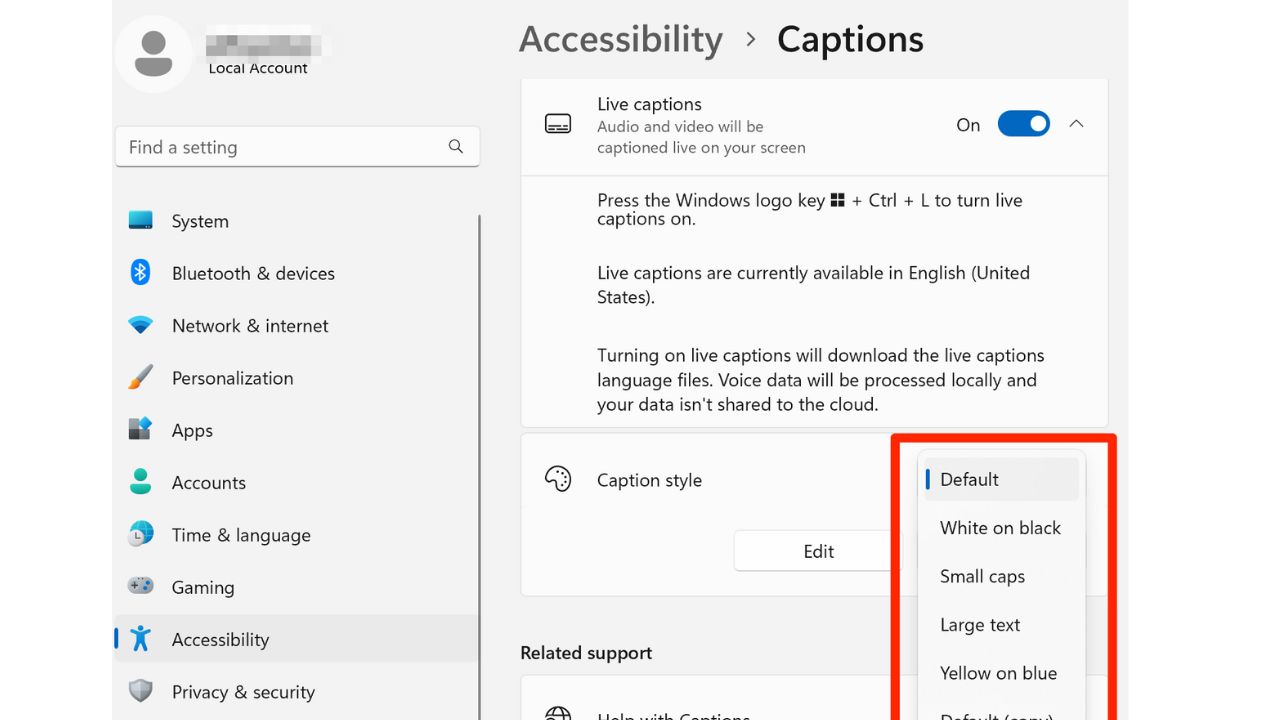
- Once you click on where it says Default (copy) you can select between White on Black, Small caps, Large text, or Yellow on blue
MORE: HOW TO BACK UP YOUR WINDOWS COMPUTER
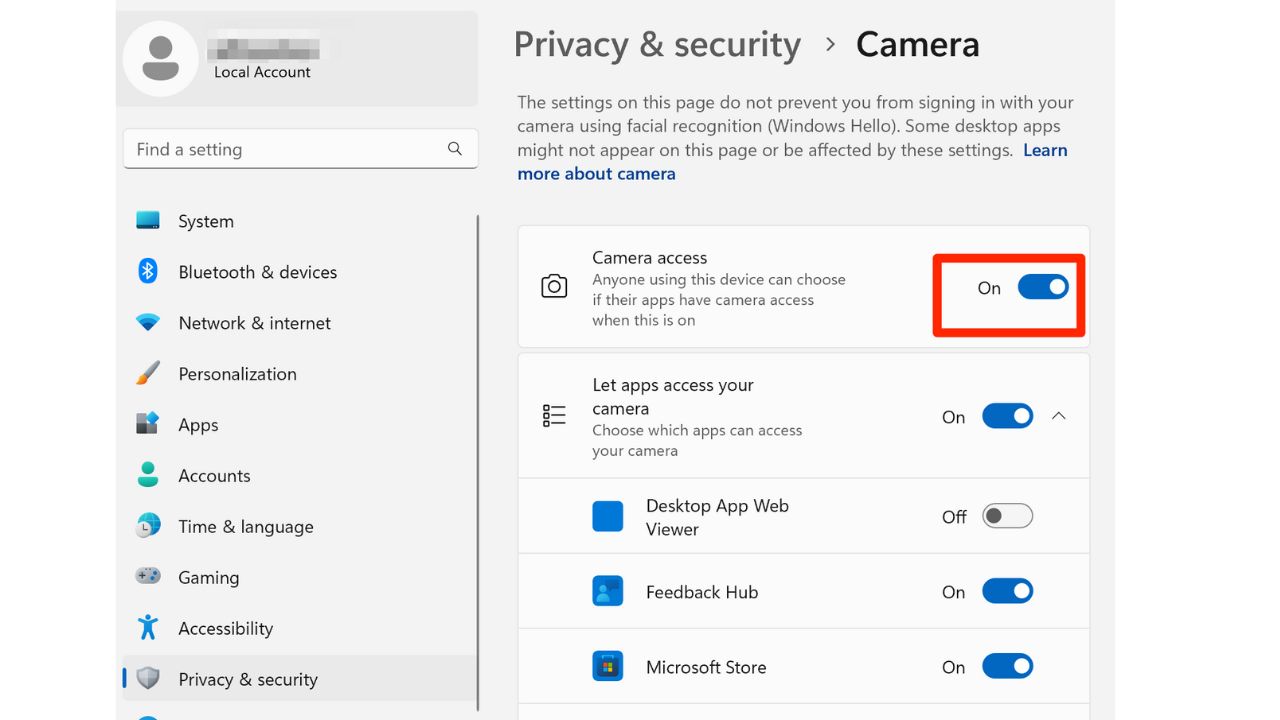
5. Enable Camera protection
Windows 11 gives special protections for each app on your computer that can prevent your camera from being used with apps that don’t need camera access.
How to enable Camera protection
- Select Start
- Go to Settings
- Click Privacy & security
- Scroll down and select Camera under App Permissions
- Turn on Let apps access your camera, and then you can choose which apps can access your camera or not
Once you have turned on camera protection, apps will need to ask your permission before they can access your camera. If you don’t want an app to access your camera, you can deny the request.
6. Turn on Clipboard history
On Windows 11, you can copy multiple items at once and view your clipboard history so that you can decide what to paste. As a refresher, clipboard history is a feature that allows you to see and access the items that you have copied or cut in the past. You can use it to paste multiple items without having to copy them again or to paste something that you copied earlier.
How to turn on Clipboard history
- Go to Settings
- Click System
- Scroll down and click Clipboard
- Toggle on Clipboard History
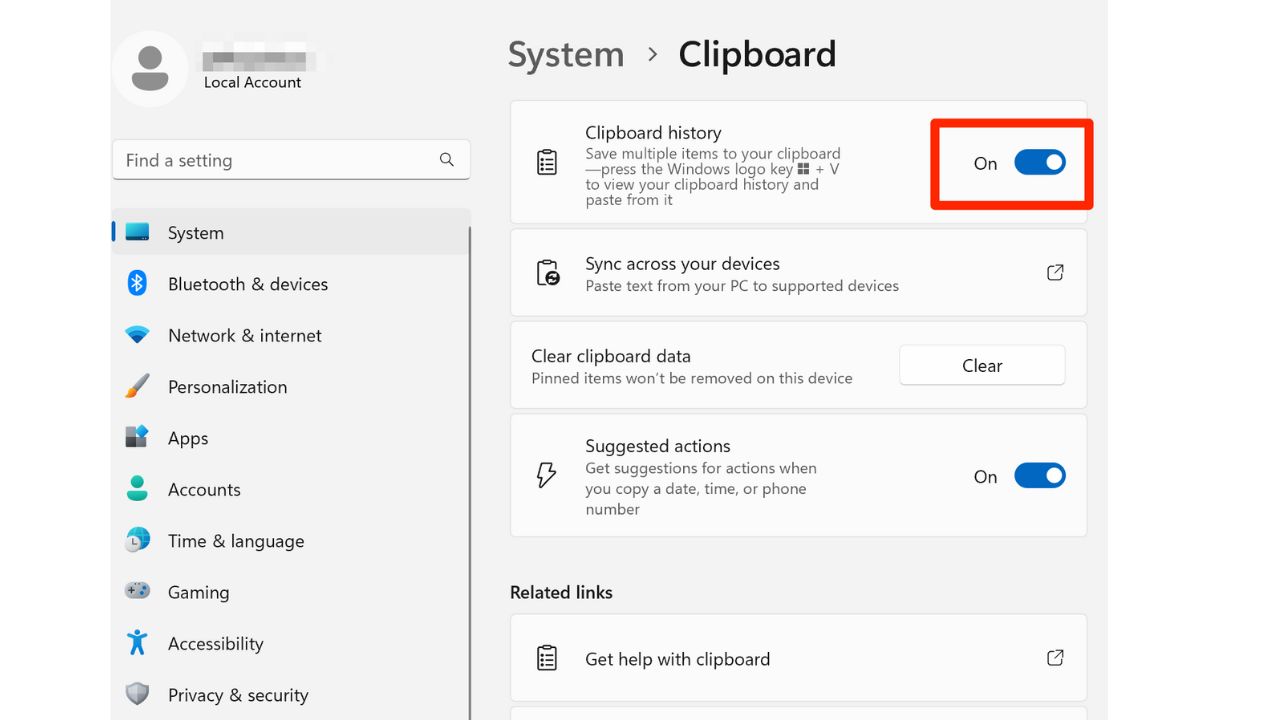
- Once enabled, you can press Windows key + V to view your clipboard history and select the item that you want to paste
7. Use the snipping tool
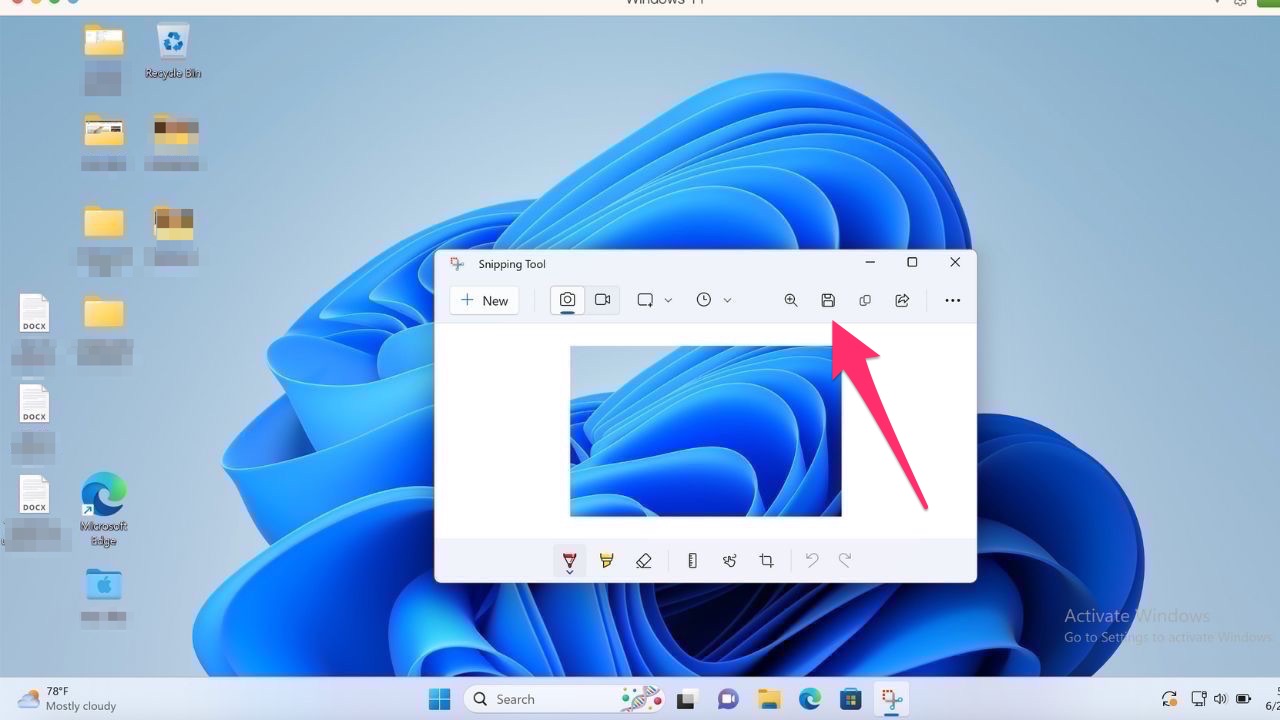
The Snipping tool allows you to take screenshots or screen recordings of either your full screen or a section of your screen.
How to use the Snipping tool
- Go to Start
- Search for Snipping tool
- Select the application
- Click the camera icon if you want to take a picture
- Click the video recording icon if you want to record your screen
- Click +New when you’re ready to begin, and adjust the parameters to fit the section of the screen you want to capture/record
- Save or send your items by clicking the icons in the top right
8. Turn on autocorrect
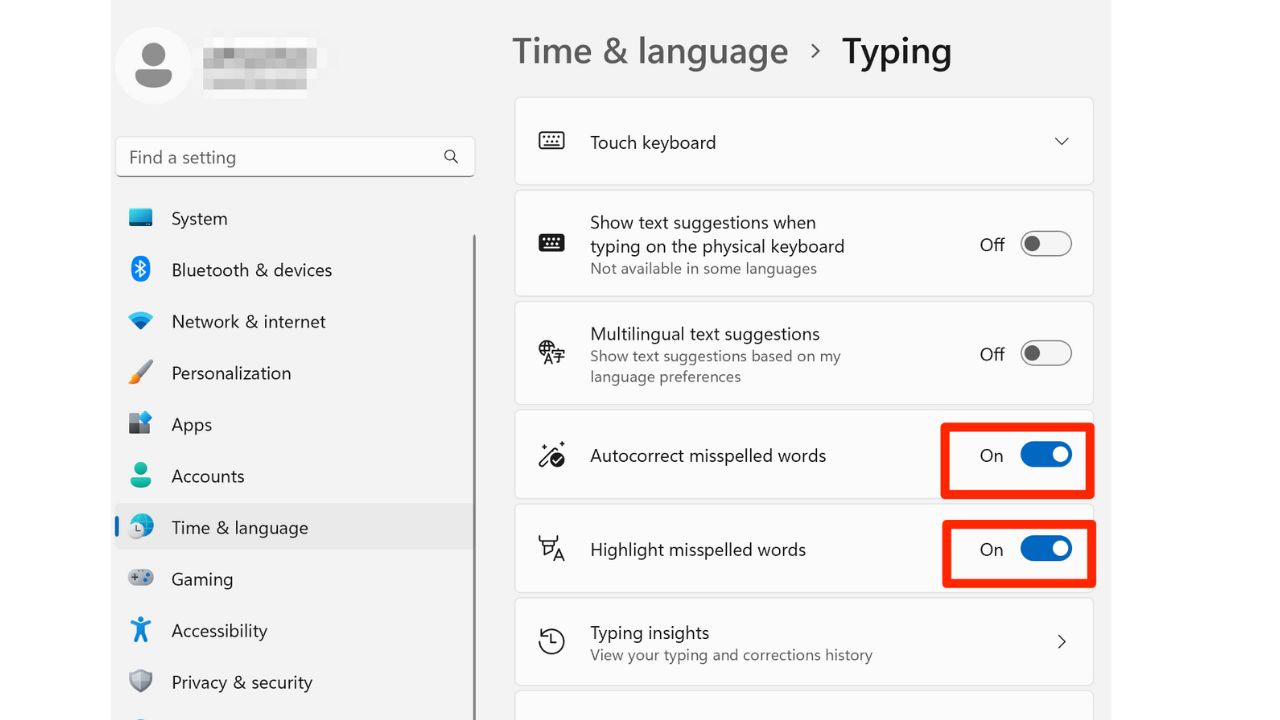
You can enable autocorrect on your Windows computer as well to avoid any embarrassing typos in emails and social media posts.
How to turn on autocorrect
- Go to Start
- Go to Settings
- Select Time & language
- Click Typing
- Turn on Autocorrect misspelled words and Highlight misspelled words
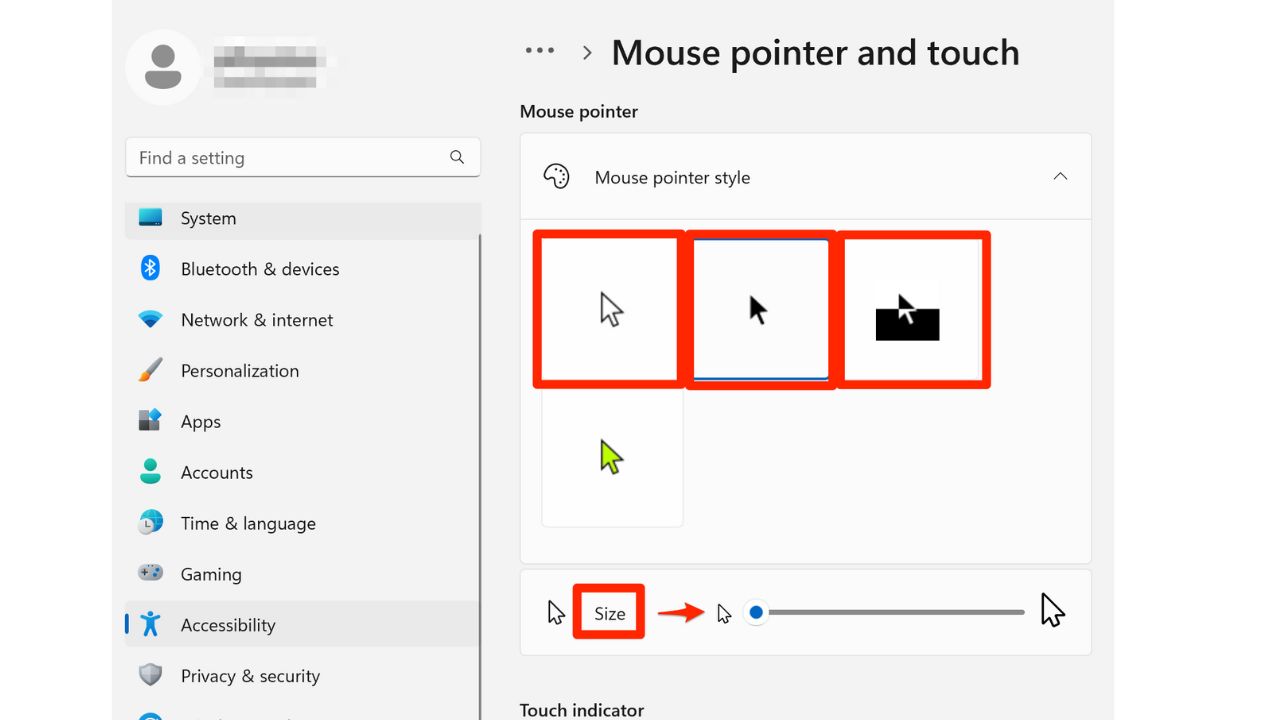
9. Change the size and style of your mouse pointer
If you’re someone who struggles to see the pointer on your computer screen or to see where it’s landing exactly, you can adjust its size.
How to change the size and style of your mouse pointer
- Go to Start
- Go to Settings
- Click Accessibility
- Tap Mouse pointer and touch
- Choose a pointer style (white, black or inverted) or adjust the size to make your mouse bigger on the screen
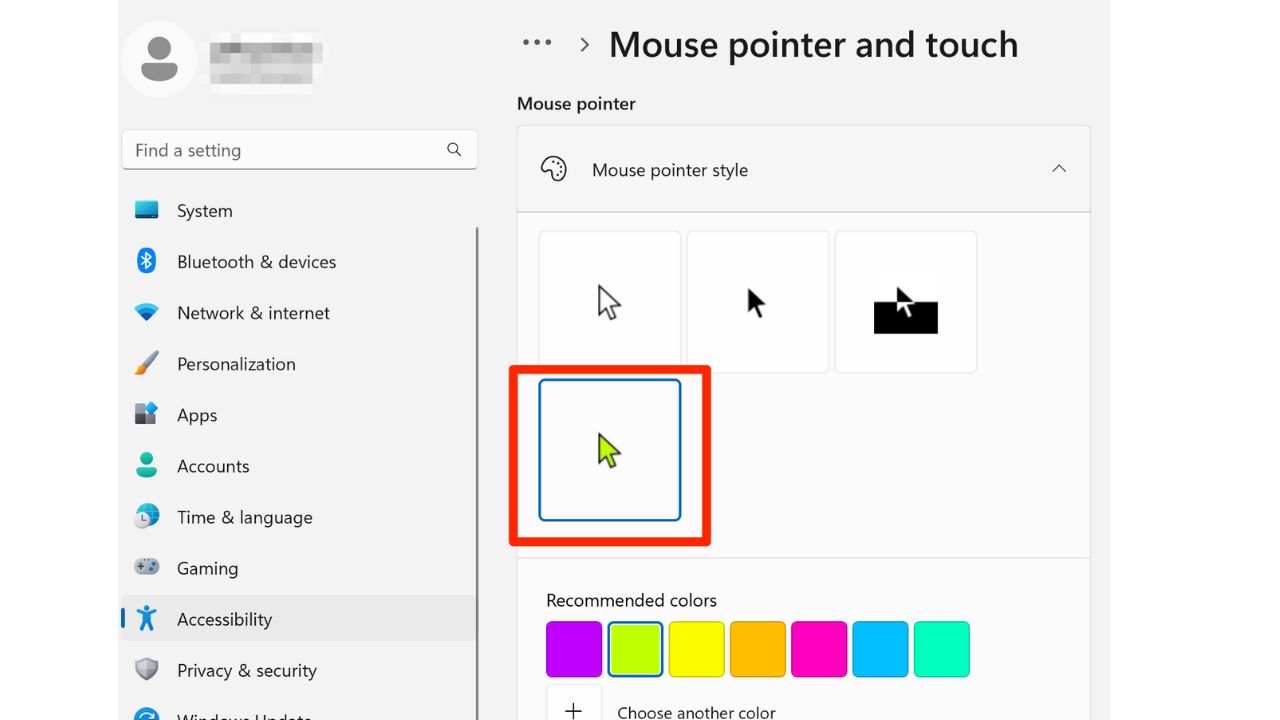
- You can also customize the color of the mouse pointer by clicking on the custom icon pointer and selecting the color of your preference
Kurt’s key takeaways
As you can see, Windows 11 has a bunch of cool features and settings that can really amp up your user experience. You’ve got options like tweaking your display settings to make everything just right, activating focus mode for those times when you need to buckle down and get things done, and taking advantage of tools like live captions and the snipping tool. It’s all about customizing and optimizing your Windows 11 experience to fit your needs and preferences. So go ahead, give these tips and tricks a try, and see how they can make your Windows 11 device work even better for you.
What other lesser-known features or hidden gems have you discovered in Windows 11 that you would recommend to fellow users? Let us know by commenting below.
FOR MORE OF MY SECURITY ALERTS, SUBSCRIBE TO MY FREE CYBERGUY REPORT NEWSLETTER HERE
Related:


