

Whether you’re trying to find the perfect birthday gift online for a loved one or searching for the best dermatologist in your area, what you search for on your computer is nobody else’s business. However, our devices are designed to make our searches more efficient, and they do so by using autofill.
Although autofill entries can quicken a search, they could also land you in some awkward situations, especially if you don’t want anyone to see what you’re searching for.
That’s why I’m going to tell you what steps you can take to delete autofill and clear out already-existing autofill on your PC and Windows browsers.
If you’re looking for how to do this on your Apple devices, click here.

Before we dive into my tips below, I want to first explain the difference between clearing out autofill and deleting autofill.
Clearing out vs. deleting autofill
- Clearing out autofill refers to the process of removing the suggestions that appear in a web browser’s address bar or search bar as you type. This may also be referred to as “deleting autocomplete suggestions.”
- Deleting autofill, on the other hand, refers to the process of removing information that is stored in the browser’s autofill settings, such as names, addresses, and credit card numbers. This information is often used to automatically fill in forms on websites, and removing it will prevent the browser from pre-populating these fields in the future.
Google Chrome browser
First, update your Google Chrome Browser
Before you see my tips below, be sure to follow these instructions to update your Google Chrome browser. About every six weeks, Google updates its browser and often updates it along the way with security updates and other smaller cosmetic changes. To keep your Google Chrome browser performing quickly and securely, be sure to update by following these instructions.
On a PC
How to delete autofill in Google Chrome browser
Once you know your Chrome browser is up-to-date, follow these instructions to delete autofill:
- Open Chrome
- In the top right-hand corner of your screen, click the 3 vertical dots (should be next to your profile picture)
- Click Settings
- In the left-hand panel, select Autofill
- A list of items that use Autofill will appear (i.e. Password Manager, Payment Methods, etc.). Click on each one that you don’t want autofill used and toggle everything off
How to clear out existing autofill data in Google Chrome browser
- Open Chrome
- In the top right-hand corner of your screen, click the 3 vertical dots (should be next to your profile picture)
- Select History, and select History again from the menu that appears
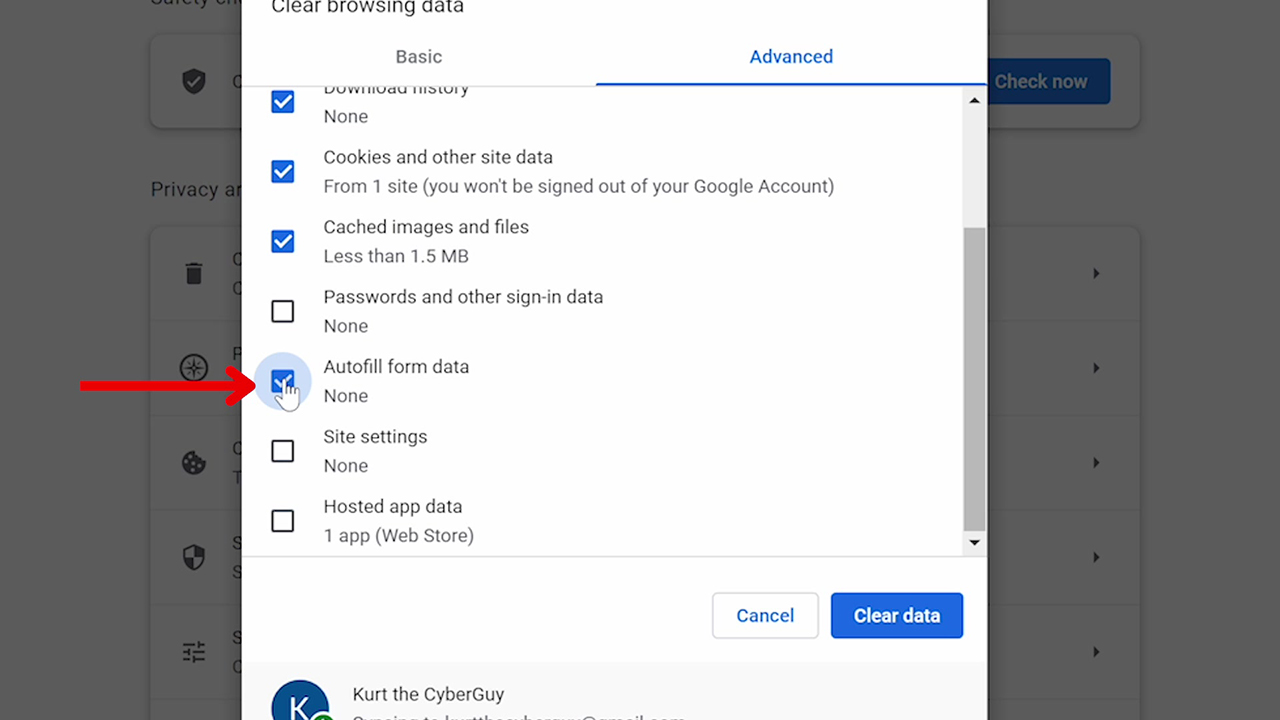
- In the panel on the left, select Clear browsing data
- Press the Advanced tab
- In the Time range menu, select All time (this step may depend on what version of Chrome you have)
- Make sure Autofill form data is checked off. Check off any other options you want to be cleared
- Select Clear data
How to clear your browser history in Google Chrome browser (PC)
By clearing your browser history, you will clear history, cookies, and cache which may be another way to prevent autofill suggestions from appearing
- Click on the three dots in the top right corner of your browser window.
- Click History from the dropdown menu.
- Click on Clear browsing data
- Select the time range you want to clear and make sure Browsing history, Cookies and other site data, and Cached images and files are selected.
- Click Clear data.
On an Android
Settings may vary depending on your Android phone’s manufacturer
- Open Chrome
- In the top right-hand corner of your screen, click the 3 vertical dots (should be next to your profile picture)
- Click Settings
- Tap Privacy
- Click Autofill forms
- Click the entry you want to delete
- Click the trash can icon to delete the entry.
Depending on your Android model, you may also want to try these steps:
- Open Chrome
- In the top right-hand corner of your screen, click the 3 vertical dots (should be next to your profile picture)
- Click Settings
- Tap Privacy and Security
- Click Clear browsing data
- Click Advanced tab at top
- Scroll down and click “Autofill form data”
- Click Clear data
How to clear your browser history in Google Chrome browser (Android)
By learning your browser history, you will clear history, cookies, and cache which may be another way to prevent autofill suggestions from appearing
- Click on the three dots in the top right corner of your browser window.
- Click History from the dropdown menu.
- Click on Clear browsing data
- Select the time range you want to clear and make sure Browsing history, Cookies and other site data, and Cached images and files are selected.
- Click Clear data.
Microsoft Edge
How to delete autofill in Microsoft Edge (PC)
- Open Microsoft Edge
- Click the 3 dots in the top right of the screen
- Select Settings
- The menu should default to Profiles. If it doesn’t, select this option from the menu on the left.
- In the Your Profile section, toggle off Passwords, Payment info, and any other options you don’t want auto-filled
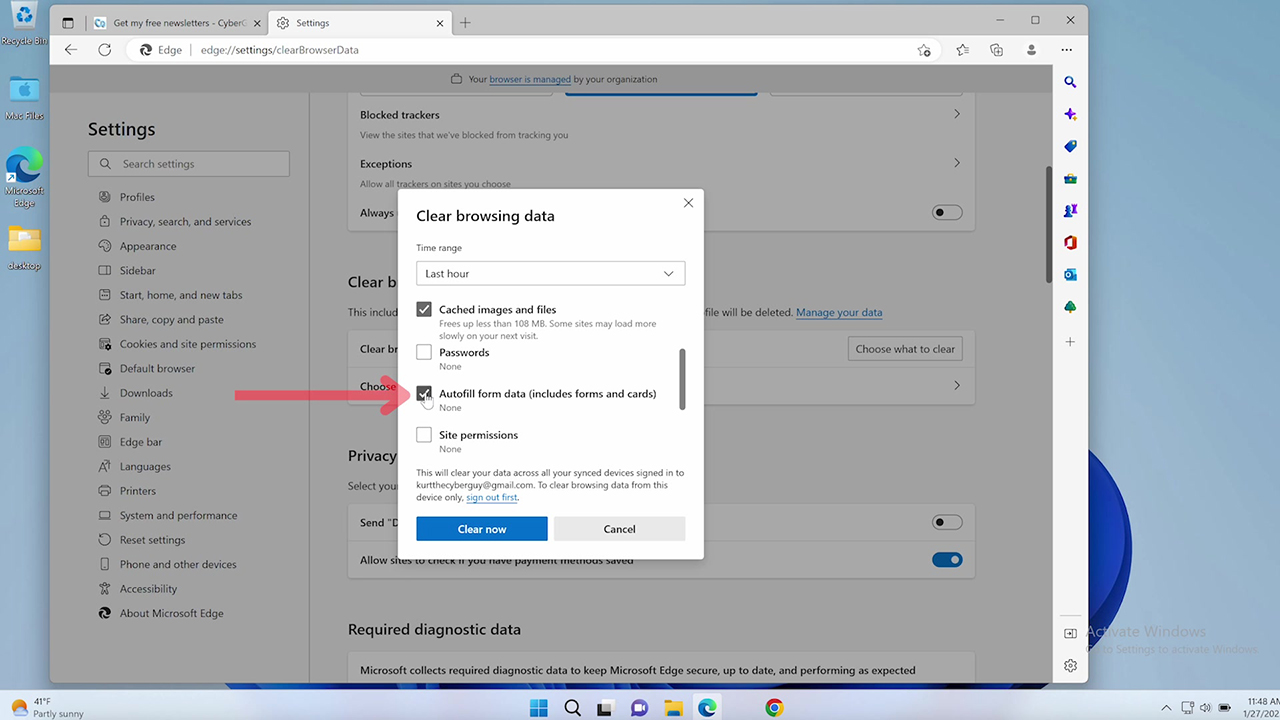
How to clear out existing autofill data in Microsoft Edge (PC)
- Open Microsoft Edge
- Click the 3 dots in the top right of the screen
- Select Settings
- Select Privacy, search, and services
- Under Clear Browsing Data, select Choose What to Clear
- In the Time Range menu, select All Time
- Check off Autofill Form Data (Includes Forms and Cards). Check off any other option you want to be cleared as well
- Click Clear Now
How to clear out browsing history in Microsoft Edge (PC)
- Open Microsoft Edge
- Click on the three horizontal dots in the upper-right corner of the window to open the Settings and More menu.
- Click on History from the menu.
- Click on Clear browsing data on the right side of the window.
- Choose the time range for which you want to clear your browsing history: the last hour, today, last 7 days, last 4 weeks, or all time.
- Select the types of data you want to clear, such as browsing history, download history, cookies, and cached images and files.
- Click Clear now button to confirm.
Firefox
How to delete autofill in Firefox
- Open Firefox
- Click the 3 lines at the top right of the screen
- Select Settings
- Select Privacy & Security
- Under Forms and Autofill, uncheck the options you wish to disable Autofill for
How to clear out existing autofill data in Firefox
- Open Firefox
- Click the 3 lines at the top right of the screen
- Select Settings
- Select Privacy & Security
- Under Logins and Passwords, uncheck Ask to save logins and passwords for websites
- To clear saved logins and passwords, click Saved Logins
- Remove any logins you don’t want to be saved
How did these steps work out for you? Let us know if you’ve found any other shortcuts to deleting autofill in your browser.
Related:
- Top browser extensions to make your life easier
- Google Chrome extensions with over 1 million downloads hijacking browsers
🛍️ SHOPPING GUIDES:
KIDS | MEN | WOMEN | TEENS | PETS |
FOR THOSE WHO LOVE:
COOKING | COFFEE | TOOLS | TRAVEL | WINE |
DEVICES:
LAPTOPS | TABLETS | PRINTERS | DESKTOPS | MONITORS | EARBUDS | HEADPHONES | KINDLES | SOUNDBARS | KINDLES | DRONES |
ACCESSORIES:
CAR | KITCHEN | LAPTOP | KEYBOARDS | PHONE | TRAVEL | KEEP IT COZY |
PERSONAL GIFTS:
PHOTOBOOKS | DIGITAL PHOTO FRAMES |
SECURITY
ANTIVIRUS | VPN | SECURE EMAIL |
CAN'T GO WRONG WITH THESE: